Evented Arduino (with Node.js)
Tuesday, May 29, 2012I love the Arduino; it's one of the most awesome technologies I've seen in quite a while: its heart is a gorgeous microcontroller with a plethora of inputs and outputs. I also love Node.js: its event driven model is very elegant and the fact that it's Javascript makes it pretty easy to develop in, even for the novice.
The Motivation
There are already several libraries out in the wild aiming at making programming the Arduino easier. Of note, Duino is an excellent library that does a fantastic job of bridging the gap between the Arduino and Node.js. In addition, Ward Cunningham has released a very nice nano-interpreter designed to allow anyone to build their own DSLs easily. Unfortunately, none of the available modules would send notification when state changed — this was a dealbreaker for me.
The Protocol
I designed an extensible, light-weight protocol to bridge the gap between Node.js and the Arduino. Each packet is variable length up to a maximum packet size of 1024 bytes. Data is read and written via the serial port and each packet is parsed and processed in order. A packet is made up of up to three parts: command, arguments, and comments. Setting a pin is pretty easy: 05:2:13:1:1. Arguments are colon separated with defined lengths, and anything after # is considered a comment. The same protocol is used bi-directionally.
      <packet> ::= <command> <argument> <comment> <EOL>

     <command> ::= [0-9a-zA-Z][0-9a-zA-Z]

    <argument> ::= <NULL>
                 | ':' [0-9]+ ':' [0-9a-zA-Z]+
                 | <argument>

     <comment> ::= <NULL>
                 | '#' [0-9a-zA-Z]+
There are a few core commands in EventDuino:
- arduino.ping() - send the ping command, should emit pong
- arduino.get(pin) - get the current state of the pin, should emit get
- arduino.set(pin, value) - set a pin to a value
- arduino.watch(pin, optionalVariance) - watch a pin for change, emits watch when changed
- arduino.unwatch(pin) - stop watching a pin
The Event Loop
A tight loop waiting for serial input doesn't really take much in the way of processing power. There is plenty of time left for the polling pins. Since polling of pins can be expensive (it takes 100ms to read from an analog pin), it isn't prudent to poll every pin on every loop. Instead, a pin is put into a watch state and only polled if requested.
    // check for the watchers, write any changes
    for (i = 0; i < 14; i++) {
      if (watchdigital[i] == 1) {
        int current = digitalRead(i);

        if (current != digital[i]) {
          digital[i] = current;

          // notify that something has changed
          doSomething(i, current);
        }
      }
    }
Enter EventDuino
I call it EventDuino. The idea is simple: you can read, you can write, and you can watch. There are four events to listen for: init, get, pong, and watch. Once init is emitted, the Arduino is ready to send and receive commands.
Installing is almost as easy as any other library.
$ npm install eventduino
Unfortunately, you're not quite done. You will need to fire up your Arduino programmer and install the source found in src/eventdu/eventdu.ino. This will turn your Arduino into an evented machine.
A Simple Example
A simple example is to build a basic temperature probe using a 10k thermistor.
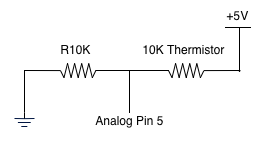
Once the thermistor has been wired in, writing the code is straightforward. The most complicated part is converting the pin value to Celsius. When setting up the watch state, a variance of 5 is being set: this means that the pin state has to change by at least 5 before an event is emitted. This prevents a swarm of events due to very slight changes in temperature.
    var EventDuino = require('eventduino');

    // your serial port may vary
    var ardy = new EventDuino({ serialport: '/dev/tty.usbmodemfa131' });

    function convertToCelsius (RawADC) {
     var temp;

     temp = Math.log(((10240000/RawADC) - 10000));
     temp = 1 / (0.001129148 + (0.000234125 * temp) +
            (0.0000000876741 * temp * temp * temp));
     temp = temp - 273.15;

     return temp;
    }

    // listen for the "watch" event
    ardy.on('watch', function (args) {
      console.log('Temperature: ' + convertToCelsius(args[1]));
    });

    // listen for the "init" event
    ardy.on('init', function (args, comment) {
      console.log('EventDuino init version ' + comment);

      // set a watch on pin 5, with a variance of 5
      ardy.watch(EventDuino.A5, 5);
    });
As you see, interfacing with an Arduino via Node.js can be insanely simple. It's easy to write what could end up being very complicated sketches very quickly in Javascript.